


Next.js is a React framework created by Guillermo Rauch, which appeared in 2016 to enhance React apps with server-side rendering and static site generation. Since then, it has constantly been growing, with over 90k stars and 2,2k+ contributors on next.js.
At the time of writing, the actual version is 12.2, which includes long-awaited features such as middlewares, on-demand ISR, and more – you can read more about them here.
In this article we’ll go through:
- Why you may want to use Next.js API routes,
- What is Logtail,
- How to deploy the Next.js app with Vercel CLI,
- How to monitor it using Vercel’s integration with Logtail,
- How to use basic Logtail features, such as filtering and alerts – we’ll cover more advanced ones in part two!
Why and when do you use API routes?
API routes in Next.js are server-side only lambda functions and (as the name suggests) provide a way to build an API. It is a perfect solution for web apps that don’t necessarily need a proper, full-blown separate backend instance but still need to have some sort of own API for various reasons.
Some of the reasons to go with Next.js API routes are:
- No need for running a separate backend server, which lowers deployment costs,
- One codebase (no more outdated DTOs),
- GraphQL & WebSockets support,
- Perfect for integrating with third-party services like Stripe, SendGrid, etc.
Like in most cases, when it comes to software development, there is no single answer to when to use certain technology, and Next.js API routes are no different.
You need to analyze your particular use-case and start from there, but from my experience, they are good for small and a bit larger web apps. Personally, I like using them with services like Firebase or Supabase because having a proper backend would be too much in that case. Instead, I can just use their dedicated JS client libraries directly in the Next.js app.
Have a project in mind?
Let’s meet - book a free consultation and we’ll get back to you within 24 hrs.
What is Logtail?
Logtail is an SQL-compatible log management platform made by BetterStack. It enables log collection virtually from anything – starting from typical web apps (like the one we will work with in this tutorial), through databases, ending with basically anything that can send POST HTTP request with data to one of Logatil’s endpoint.
Its main (but not only!) advantages are:
- Integrations with various providers,
- Ability to query stored logs using dedicated query format or SQL,
- Alerts,
- Dashboards,
- Really intuitive and functional interface,
- Teams support.
Like most of the modern tools on the market, Logtail is not free, although it has a Free tier (you can use it without providing card details, I wish more companies would do that), which can easily handle one production app, or even more. Some of the features are locked to higher tiers, but as long as you just want to store & browse your logs, Free tier should do just fine.
Up-to-date pricing of Logtail is available here.
Set up and easily deploy the app with Vercel CLI
Vercel (former ZEIT) is a deployment platform made by the creators of Next.js, which provides many advantages when they both work together:
- the minimal configuration required for the deployment (you’ll see that in a bit),
- all of the newest Next.js features are supported out of the box,
- fast builds,
- add-ons Marketplace with integrations from various providers.
Of course, we’ll take advantage of that, so we are gonna deploy our app using Vercel’s free plan and then use Vercel’s Marketplace to enable integration between the app and Logtail.
Before you start
You should have these installed:
- Node 14+,
pnpmpackage manager (you can use another one if you want, howeverpnpm’slockfile is included in the repo),- Vercel CLI.
Make sure you have everything on your machine, and we are ready to start!
Clone and run the app locally
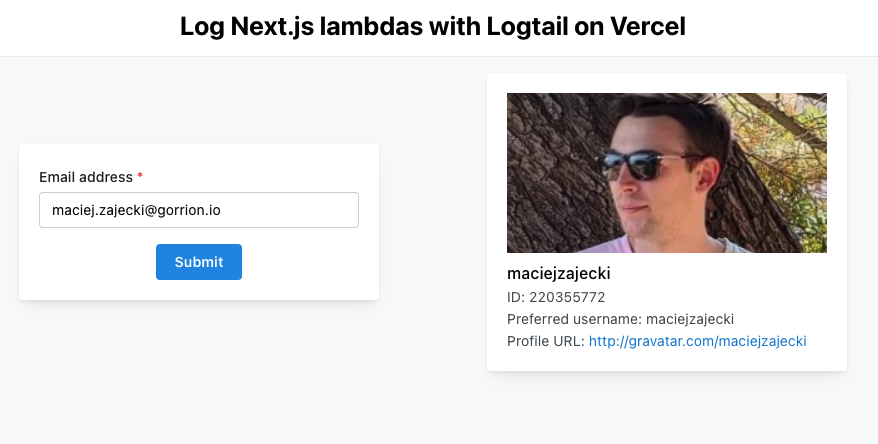
To start using Logtail, we have to set up a sample app that we will then monitor. It is available on my GitLab here, and its purpose is to fetch data from Gravatar for a provided email address.
Clone repo from the link above and inside directory run:
pnpm install
You can then start the app by running:
pnpm run dev
It will be available on localhost:3000 – go there and check your (or someone else’s) Gravatar data to see the app working.
Some insight into the app
Apart from default Next.js directories, the app consists of these main modules:
/components– mostly layout stuff; made with Mantine (which I highly recommend),/data– types used for API calls,/hooks–useFetchGravatarDatahook used in main component,/utils– utilities used through the app.
If you take a look inside /pages directory, you’ll see /api/data/[email].ts file – it contains a handler for that particular API route – this is the lambda function invoked when accessing that route, which we will monitor later on. Its purpose is to respond to the GET request from the app with data fetched from Gravatar API. Take a look at its code:
The code is pretty simple – firstly, we check for email address presence. Then, a call is made to Gravatar API, and profile data is fetched. Next, we return a response from our API route containing selected data from the Gravatar profile.
Note that the whole logic is wrapped in a try…catch clause – that’s because we want to see details of the caught errors in the console and just return status 500 instead of seeing the default Next.js error page.
Deploy the app
As I said, we’ll take advantage of Next.js standing close to Vercel and deploy our sample app in seconds to that platform. To proceed, you should have an account on Vercel – if you don’t, go there and sign up. You can use GitHub, GitLab, or just plain email.
- To start deployment, run the command below the inside root of your cloned repo:
vercel
- You’ll be asked to log in (if you are not already) – a page will open in your default browser, and after logging in, you can go back to CLI.
- Next, you’ll be asked if you want to deploy your app – of course, you do! So type
Yand press enter. - In the next step, select the scope in which you want to deploy the app – if you haven’t used Vercel before, there will be only one option that you want to select.
- CLI will ask if you want to link the app to an existing project – the answer is no since we want to start clean. So type
Nand press enter. - Next, you can enter a custom name if you want to; if not, just press enter, and the folder name will be used.
- You’ll be asked where our code is located – since we started deployment inside the repo folder, leave the default
./there and just press enter. - In the last step, CLI will ask if you want to modify project settings – you probably don’t because they were automatically detected to match our Next.js app, so just type
Nand press enter.
This was the last step, and now Vercel CLI will take care of deploying our app and making it live! As soon as it finishes, you’ll be provided with a link to live deployment, and we can proceed further and enable integration between Vercel deployment and Logtail.
Integrate Logtail with the app using Vercel
As mentioned before, we’ll take advantage of deploying the Next.js app to Vercel and enable integration with Logtail there. Doing it that way has some advantages:
- no additional packages and code is needed*,
- automatically added environment variables,
- fully featured log management system running in minutes.
It’s a great choice for monitoring API routes since you basically don’t have to add anything to your code base*
⚠️ * – This integration (apart from requests themselves) logs the default output of the app. So, if you already have console.log, console.warn, etc., in proper places in your API routes, you don’t have to add anything else. If not, I recommend doing so.
Enable integration using Marketplace
So, let’s begin! Go to your Vercel Dashboard and find your new deployment of the app. Select it, open Settings tab, click on Integrations and then Browse Marketplace. Search for logtail, select it and click Add Integration.
You’ll be asked to which scope you want to add this integration – you probably have just one, so select it but otherwise, select the one in which you deployed the sample app.
In the next step, I recommend selecting Specific Projects and adding our sample app. Finally, click Add Integration and process of adding it to our deployment will begin.
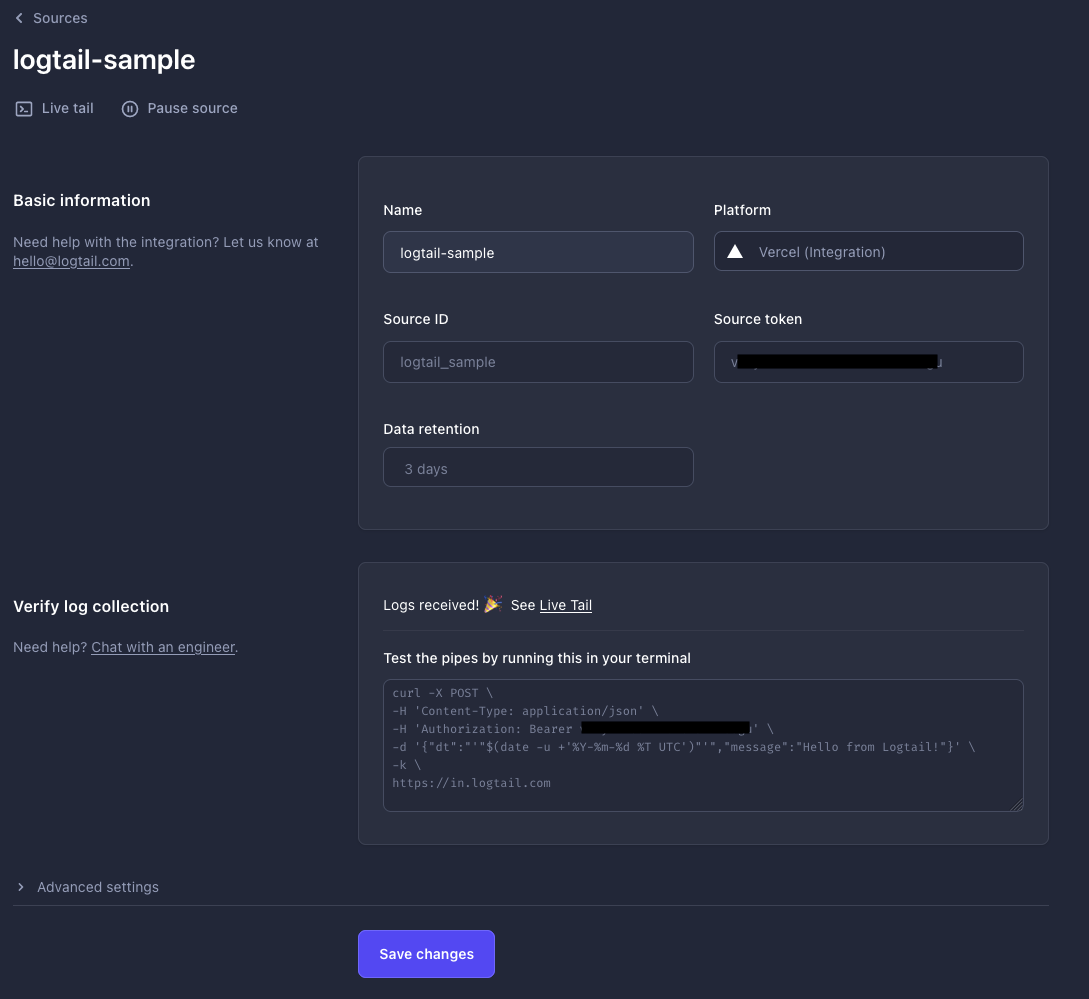
You’ll be taken to a page in Logtail domain, in which you have to confirm that you want to connect Logtail with Vercel. You can see here that environment variables needed by Logatil will be added automatically. Finally, click on Configure, which will take you to the Logtail panel.
And that’s it! With these simple steps, we’ve configured Logtail log drain for our newly deployed app!
But does it really work?
Yes, but don’t take my word for it! Select Live tail in the Logtail panel (the sidebar on the left) and open the previously deployed app in another tab. Currently, there will be no logs since we haven’t checked any email after enabling our integration between Vercel and Logtail – let’s do that now, so fetch Gravatar data for some address.
Now go back to the Logtail tab – you should see details on the request made to our API route! If you don’t, just refresh the page, and they will appear.
Some basic details on a single request include:
- timestamp,
- source name (handy in case you have multiple sources added in Logtail),
- response code,
- request method,
- host address,
- request path,
- client IP address.
As you can see, Logtail captures enough data for you to be able to find what API route response was at a particular time. It is especially handy when, for example, a client said he got an unknown error at this specific moment, so you can just filter (which, by the way, is great in Logtail, but we’ll talk about that in a moment) and see what exactly went wrong.
Trigger & monitor sample exception
But what happens if something really goes wrong, for example, an error is thrown? Let’s check that! Fetch Gravatar data for throw@exception.test address – you’ll see notification about an error in the app, but what about Logtail? Switch to its tab and see! Remember that try…catch with console.error that was wrapping the entire logic of our API route? It came in handy here because after error was thrown, its details were captured by Logtail, and a status code 500 response was returned to client:
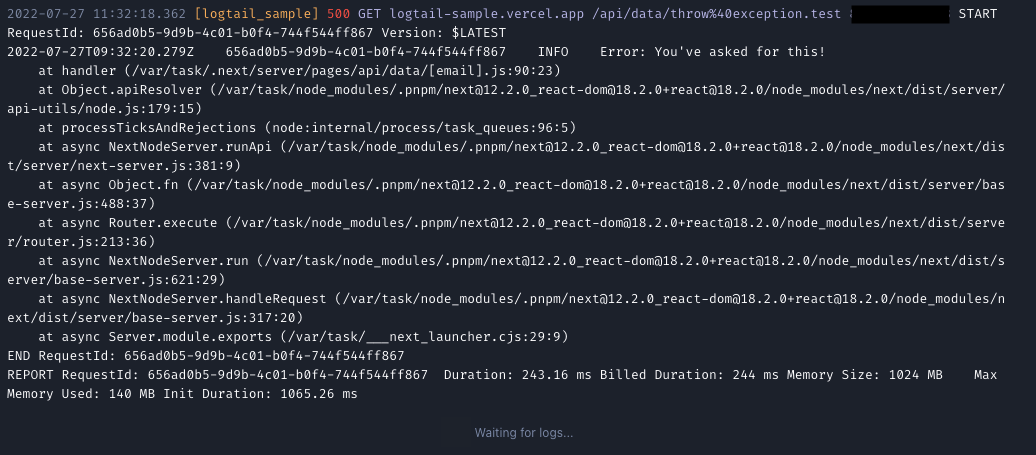
Details of that error should be extensive enough for you to find when and where where exactly it occurred, which, combined with the advanced filtering that Logtail provides, can guide you to the source of the problem in seconds. If not, you can easily enhance captured data by extending your console.error arguments with additional information.
Important data at a glance
Considering the amount of data that Logtail could collect in a production app, it would be handy if you could quickly filter all of these logs and find just the ones that actually matter. Fortunately, Logtail provides simple as well as very advanced features that allow us to do that and much, much more.
Save your queries with Views
Let’s take a look at Views – a feature that will enable you to save filtering query and view or reuse it later in other parts of Logtail. Views are used for:
- saving complex filter queries,
- setting alerts.
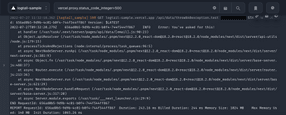
Go to Live tail, where you should see a few entries from playing with the app earlier. You may have noticed that some of the single log entry information are clickable – by clicking, e.g., status code 500, you’ll start filtering by that code, so only entries containing response with code 500 will appear:

Of course, you can keep selecting other parameters and extend your filter query further, or you can just manually type the filter query – they open a possibility to create really extensive filters, so you should check that out. I’m leaving a link here for Logtail docs on how to build these filter queries → click.
Assuming you’ve created your desired filter query, we will now save a new View – to do that, just click bookmark icon on the filter toolbar. You will be prompted under what name save that view, so name it (or leave the default name) and save your first view. To explore your views, just go to Views on the sidebar.
Alerting when things go wrong
Imagine you have a production app with thousands of requests per day. It is basically impossible (and just stupid) to manually check every day for 404, 500, etc. And furthermore, let’s say something went wrong at 15:00, but your daily routine would be to check for errors at 10:00 – that’s almost a whole day of delay!
Logtail Alerts feature was made to solve that issue. Based on earlier created Views, it can notify you (or the whole team) when the amount of logs found under a particular filter exceeds a certain threshold. Let’s set up a sample alert for our app!
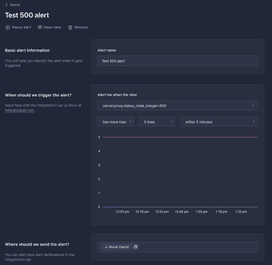
Create & test your sample alert
Go to Alerts and click Create alert – you’ll see the alert setup screen. Name the alert whatever you like, but remember that its notifications will include that name, so you probably want something simple but descriptive at the same time.
You may notice that the View field has our previously created view selected – that’s because it was recently created. Next, you have to specify the threshold after which alert will be issued. Select has more than, 5 lines and within 5 minutes. A single log entry is considered to be one line here.
Last but not least, you have to specify who to notify – your only option is yourself (since we are not having anyone else on the team), so select that and click Create alert. Now, you can go back to our app and trigger 500 response 6 times within 5 minutes by fetching data for throw@exception.test address. You should receive an email message shortly after triggering the alert.

Some final words of the first part
We’ll end this first article here since we’ve covered the basics of how to work with Logtail. I hope that you have noticed how Logtail can improve maintaining the health of your app – and I’m not talking only Next.js and Vercel, since Logtail is a very universal platform.
Let’s quickly summarise what we went through in this article:
- What are and how do Next.js API routes work,
- How to quickly deploy our sample app using Vercel CLI,
- Enabling integration between the app on Vercel and Logtail,
- Live logs view with Live Tail,
- Creating and saving filters using Views,
- Alerting when certain conditions are met.
In the next article of the series, we will cover more advanced features of Logtail, such as querying with SQL and visualizing your data with dashboards.
Thank you for giving this article a try, and have a great day! 😄
Have a project in mind?
Let’s meet - book a free consultation and we’ll get back to you within 24 hrs.
Maciej is a full-stack developer with a passion for creating seamless, beautiful, and performant Web and mobile applications. Not afraid of new challenges and technologies, he can support development at any stage. Outside of coding, Maciej enjoys spending time with his two lovely cats. As an avid tennis player, he hits the courts regularly to stay fit and unwind.
Other worthy reads


