


How to build a React and Node custom Shopify app using Shopify CLI
Shopify – an e-commerce platform that allows you to create an online store in a few simple steps. It’s no wonder that it got so popular these days. Shopify serves over a million online stores in 175 countries, and its popularity is growing every year. So why is Shopify that successful?
The answer is simple – it’s because of the large and wonderful community that makes storefront themes and additional Shopify apps. It’s the add-on apps that extend Shopify’s capabilities and make this e-commerce platform more powerful than ever.
Custom or public app?
In the Shopify App Store, you can find over 6,000 different applications, from those that will allow you to increase your sales to those that will help you manage your business. If you want to know a few apps that will help you increase sales in your Shopify store, check out this article.
But what if you can’t find an application that solves your problem or you have one that doesn’t have the functionalities you’re interested in? In that case, you can write your own Shopify app.
In this blog post, I’ll show you how to do it step-by-step, from scratch. Additionally, I’ll explain why creating a Shopify app is so simple and universal. This is not your ordinary guide to building a Shopify app, so buckle up and let’s get started!
Shopify app anatomy
Shopify apps are divided into three types:
- Public apps – these ones are available for anyone to download from the Shopify App Store, where developers can list apps for free and for a one-time or recurring fee. As simple as that.
- Custom apps – these apps are created for a narrow audience. Hence, they aren’t available on the Shopify app store. Developers share them with the stores of their choice.
- Private apps – these, on the other hand, are very similar to custom apps but with some limitations: you can’t load them directly in the admin panel, and they don’t have access to extensions.
Shopify apps differ from other solutions in the way they’re developed and maintained. First and foremost, Shopify apps are hosted on your infrastructure. This allows us to create an app in virtually any programming language that supports HTTP requests. So your app connects to Shopify through Shopify API – you can find a list and documentation of these APIs in this link.
Moreover, Shopify provides SDKs and libraries that make it easier to connect to Shopify’s APIs or even CLIs to help you generate themes and apps. Also, officially, Shopify supports three programming languages: Ruby, Python, and Node. However, the Shopify community supported PHP or .Net as well.
The list of all tools for Shopify developers can be found here.
Requirements
Your application will be created using the Shopify CLI, so you can quickly create the foundation of your app with a ready-made integration to Shopify API. You can find instructions for installing the Shopify CLI here.
To get started, you’ll also need:
- An installed Node.js environment including npm.
- A partner account on the Shopify platform, which you can set up here.
- Developer Store to test your application – here are the instructions for creating development stores.
Initiating a project
To get started, you need to connect the Shopify CLI to your partner account on Shopify. To do this, type the following command into your terminal:
shopify login
From there, you’ll be redirected to the Shopify partner account login page. After successfully logging in, you should be redirected to the confirmation page and the message “Logged into partner organization” should appear in the terminal. You can then proceed to actually initialize your application by typing the following command in the terminal:
shopify node create -n YourAppName
Here, you’ll see a wizard that will help you create the Shopify app. In the first step, you’ll be asked about the type of your app: public app or custom app.
Here, it’ll be custom. Next, move on to choosing the store where you’d like to install your application. Usually, it’ll be a store designed especially for testing your application. When the application is working according to your requirements, you’ll be able to install it in the target store of your client.
After going through the wizard, you should see the newly created application in your partner account under Apps -> All apps.
Let us now return once again to your terminal. After navigating to the folder with the newly created application, let’s type the following command in the terminal:
shopify node serve
This command will create an ngrok tunnel for your application and start the local development server. You’ll also get a link to install your application in the previously selected development store. Click on this link and log into the store. After logging in, you’ll be taken to the application installation screen. Once the app is installed, you’re ready to create your functionality. So let’s do it!
What are you going to create?
Our goal (or rather your goal) today is to create a simple application that will familiarize you with the concept of the Shopify apps. That’s why you’ll create a simple page view with settings that will be stored in your server’s memory. In the settings, you’ll keep the product selected from the list by the user.
Also, you’ll use the Polaris design system to create a consistent settings view with the rest of the Shopify application components. This system was developed by Shopify and has ready-made React components for implementation.
Learn more about design systems and their role in product design.
Have a project in mind?
Let’s meet - book a free consultation and we’ll get back to you within 24 hrs.
Implementation stage
Luckily, Shopify CLI resolves the worst part of your writing application – the authorization with the e-commerce platform. So now, all you have to do is implement your functionality. Let’s start by creating a settings view.
Settings page
First, create the view in the `pages/index.js` file – start by wrapping the entire view in the page layout of your choice. What’s great is that Shopify provides several layouts depending on the application. For the settings page, it’ll be annotated layouts.
The next step is to create the logic that will help you select the product you want to save in the settings. To do this, use the ResourcePicker component. It takes two required properties, resourceType and open.
The first property is the type of resource you want to pick. The second property is responsible for managing the display of the component because it’s actually a modal and takes the values true or false. In addition, you should also set the onCancel and onSelection properties. For a nice look, use the CalloutCard component.
So far, your application looks like this:

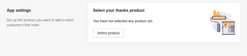
Once you have that, it’s time to make the app actually do what you intended it to do (and not just look pretty).
Retrieving and saving settings on server
Retrieving and saving settings will be done through a REST API. At this point, you need to create two endpoints on your server:
- GET to retrieve the store settings,
- POST to save the settings.
So add two endpoints to your router from the Koa framework.
In the very beginning, you need to authorize the incoming request. Thanks to this, you can be sure that only authorized people/stores have accessed to your data. In other words, you need to check if it actually comes from your app and from which store (since your digital product can be used in many stores). For this, use the ready-made mechanism provided by Shopify.
On the server, use the loadCurrentSession function provided by the @shopify/shopify-api library, which will return the session data if it’s active. If the session is inactive or the store is not yet registered in your app, you can redirect the request to `/auth` endpoint, which will create a valid session and register the store in your application.
With the request authorization out of the way, it’s time to move on to the actual implementation of saving the settings.
Start by extracting the product ID from the request body and storing it in the store settings object. For simplicity, save the settings in an “Object“, in the target application. In this way, you’re saving this data in a database.
The next step is to retrieve the product details and return it to your app, so it can be displayed correctly. Querying the Shopify Admin API, you do it from the built-in Rest client from the @shopify/shopify-api library. But first, you need to create the client by passing it the current session. Then, you can use the client to perform a query for a particular product.
There’s nothing left to do but to return the product object to your application. The whole logic for saving settings looks like this:
Retrieving the settings will look very similar, except that you’ll need solely the product ID from the settings object.
React hook for managing settings state in the app
Now that your server is ready, it’s time to implement this in the app. Start with a hook that will have a setting state and functions to change it in your application.
Note that for each request sent to your API, you need to include an authorization header with the current session token. To get such a token, use the @shopify/app-bridge-utils library and its getSessionToken function. However, it needs an actual application object as an argument, which you can retrieve using the useAppBridge hook from the @shopify/app-bridge-react library. So the function to retrieve the current settings might look like this:
The function to save the settings will work similarly, the difference is that you need to send a POST request whose body will contain the product ID.
The entire hook for managing settings will look like this:
Showing selected product
Once you have the settings saved and you can retrieve them every time the app loads, it’s time to show them off. Let’s create a view that will display the selected product, and additionally give you the ability to set up a new product.
Display the product using the ResourceList component and a suitably modified ResourceItem. The whole thing will be shown in the Card component so that you can easily add a header and an action button.
Start by preparing the ResourceItem component. It should display the product name and image, if anything.
ResourceList accepts an array of items to display, but nothing prevents you from passing just one item in the array. The previously prepared ResourceItem needs to be passed as a component to render the array elements.
And this is the current view:


Conclusion
And just like that, you’ve created an application that saves and shows the product you selected. If you want to see the whole solution, it’s available here.
Plus, you learned about the great design system made by Shopify – Polaris, which makes it much easier for you to create user interfaces.
This is just a small example of how you can easily and quickly create an application in Shopify and communicate with your API server. But, I think it already gave you an idea of how great is Shopify. If you want to learn more about creating your own Shopify app, let me know. I’d be happy to write some more about this topic.

Have a project in mind?
Let’s meet - book a free consultation and we’ll get back to you within 24 hrs.
Dive into Jakub’s articles on e-commerce and building Shopify apps.
Other worthy reads


